Self-Instrumenting Lambda Functions

I am a Lead Consultant at Cognizant Servian, with a diverse industry background ranging from startup scale embedded IOT and Industry 4.0 through to enterprise scale Edutech companies and utility providers. My expertise lies in cloud native, secure software development, with a keen interest in exploring emerging technologies.
Lambda functions are a welcome shift from the monolithic application chassis we had before. Now our complexity lives in our infrastructure rather than in our microservices. However, when creating a new service was something that could easily be templated, adding nice wrappers and middleware around our handlers was easily manageable due to only a few points of entry to our services. Now with as many points of entry as handlers, we have to look at new ways of enabling our developers to comply with organisational practices without interrupting the development process.
Enter the self-instrumenting lambda function.
The self-instrumenting lambda function pattern is a nice way to ensure that our organisation-specific code is run on each lambda. One of the key features of this pattern is that it shifts the operation of being compliant from opt-in (i.e. including a decorator from a layer or similar) to opt-out. This improves our compliance posture as it makes compliance the default, which to our developers is great as it is one less thing they need to think about in their development process. This allows them to focus on the functionality that is going to provide value to the business without checking off a whole list of prerequisites.
So how does this magical concept work? To answer that we're going to use a common infrastructure as code (IaC) tool, CDKTF (Cloud Development Kit for Terraform). This will allow us to leverage the aspect functionality to ensure compliance with our self-instrumentation.
You may be used to lambda functions and layers that are used like this:
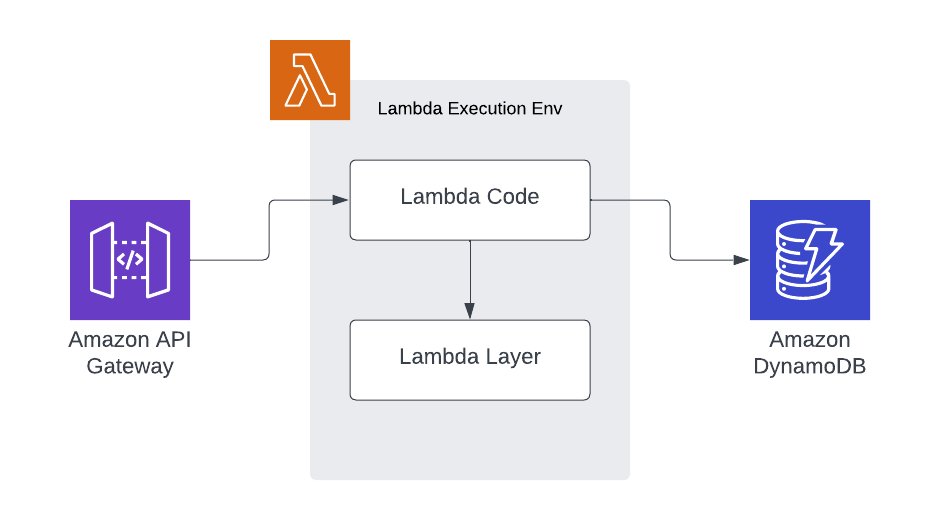
We have a request come into our lambda handler, the lambda handler consumes functionality from a lambda layer and coordinates calls to downstream services. The Lambdas that we are going to write operate in a fundamentally different way:
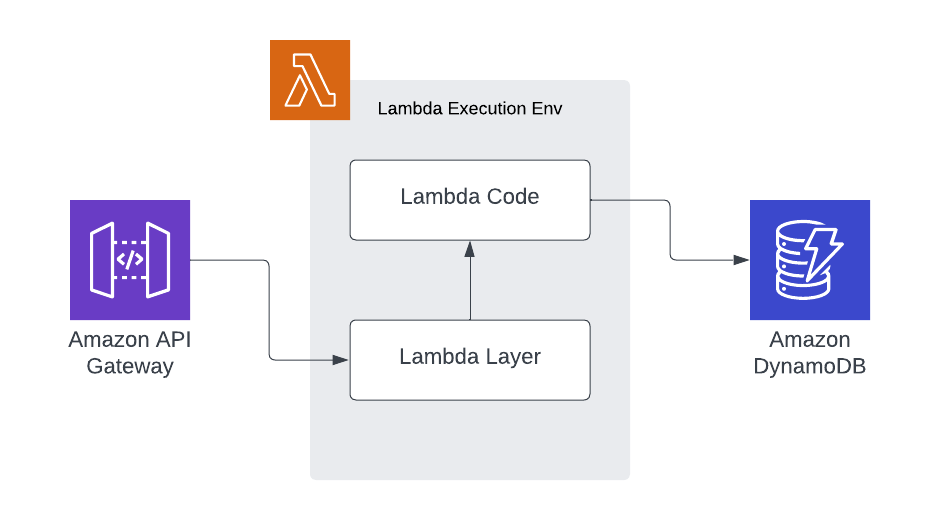
In this scenario, our registered handler is present in the lambda layer. The lambda layer is then responsible for calling the user-defined handler in the actual lambda code bundle.
This has a few unique advantages. Any common functionality we want to add is now in the lambda layer. We don't need to rely on the deployed code bundle to opt into compliance. Instead, the lambda functions are compliant by default, and to break compliance you must actively opt out.
To instrument the lambda layer I have used the Newrelic instrumentation layer repo as a base. They have a similar capability distributed as a layer to provide Newrelic observability in lambda functions, you can view their layers here.
So let's dive into the code, all of these snippets are available as a deployable application on my Github: https://github.com/Aiden-Ziegelaar/self-instrumenting-lambda-demo.
To start with, we'll take a look at the lambda function we're going to call, this lambda function will be authenticated with an API key.
import {
  APIGatewayProxyEventV2,
  APIGatewayEventRequestContextV2,
  APIGatewayProxyStructuredResultV2,
} from "aws-lambda";

export function handler(
  // eslint-disable-next-line @typescript-eslint/no-unused-vars
  _event: APIGatewayProxyEventV2,
  // eslint-disable-next-line @typescript-eslint/no-unused-vars
  _context: APIGatewayEventRequestContextV2,
): APIGatewayProxyStructuredResultV2 {
  return {
    body: JSON.stringify({
      message: "Hello world!",
    }),
    statusCode: 200,
  };
}
That is our entire lambda in its final form, no extra code is required to make it compliant with our API key authenticator. The developer of this function does not need to worry about adding authentication, in this repo, they cannot add an unauthenticated lambda function by design. This allows developers to spend their time and cognitive capacity on the parts of the application that matter and provide tangible benefits to the company, namely the business logic.
So then how do we deploy this function? We use a CDKTF lambda function resource:
new aws.lambdaFunction.LambdaFunction(this, "hello-world-lambda", {
  functionName: `${APP_NAME}_hello-world-lambda`,
  runtime: "nodejs18.x",
  handler: "index.handler",
  sourceCodeHash: crypto
    .createHash("sha256")
    .update(
      fs.readFileSync(path.join(PWD, "dist/functions/hello-world.zip")),
    )
    .digest("hex"),
  role: lambdaRole.arn,
  filename: path.join(PWD, "dist/functions/hello-world.zip"),
  environment: {
    variables: {
      FUNCTION_NAME: `${APP_NAME}_hello-world-lambda`,
    },
  },
});
Once again, this is our entire resource definition for the lambda function, the developer still has not needed to opt into authentication with an API key. So now comes the interesting part, from the developer's perspective they've just written and deployed a lambda function without needing to understand any specific ways of creating or writing resources. However, everything they've written is fully compliant with the authentication required by the business. The developer has also not had to read internal compliance documentation to be productive and contribute.
So now let's take a peek behind the machinations providing this capability. There are two core parts to this; the lambda layer and the CDKTF Aspect.
We'll start with the lambda layer, this is where the logic for authenticating our application lives. The lambda layer consists of the patcher, the wrapper and the handler. The patcher provides a way to take a lambda handler path and require it dynamically at runtime into our handler. The wrapper takes a lambda function handler as an input and then returns a new handler that is wrapped with our logic, similar to the decorator pattern. Finally, the handler brings these two elements together, patching our user-defined handler with our wrapper and returning the resulting handler. So our handler for our layer looks something like this:
import { patchCommonJSHandler } from "./patcher";
import { wrapHandler } from "./apikey-lambda-layer";
import {
  APIGatewayProxyEventV2,
  APIGatewayEventRequestContextV2,
  APIGatewayProxyStructuredResultV2,
} from "aws-lambda";

export const handler = patchCommonJSHandler<
  APIGatewayProxyEventV2,
  APIGatewayEventRequestContextV2,
  APIGatewayProxyStructuredResultV2 | Promise<APIGatewayProxyStructuredResultV2>
>(wrapHandler, process.env.USER_HANDLER);
We take our handler wrapper, wrapHandler, and use it to patch our user handler, which is stored in an environment variable (this will be important later).
Now looking at our wrapper we can see the actual authentication logic:
import { createHash, timingSafeEqual } from "crypto";
import { TLambdaFunction } from "./patcher";
import {
  APIGatewayProxyEventV2,
  APIGatewayEventRequestContextV2,
  APIGatewayProxyStructuredResultV2,
} from "aws-lambda";

type THandler = TLambdaFunction<
  APIGatewayProxyEventV2,
  APIGatewayEventRequestContextV2,
  APIGatewayProxyStructuredResultV2 | Promise<APIGatewayProxyStructuredResultV2>
>;

export function wrapHandler(userHandler: THandler): THandler {
  const API_KEY = process.env.API_KEY;
  const API_KEY_HEADER = "apikey";

  if (!API_KEY) {
    throw new Error("No api key parameter provided, in env var API_KEY");
  }
  const apikeyHash = createHash("sha256").update(API_KEY).digest();
  return async function handler(
    event: APIGatewayProxyEventV2,
    context: APIGatewayEventRequestContextV2,
  ): Promise<APIGatewayProxyStructuredResultV2> {
    const authorization = event.headers[API_KEY_HEADER] || "";
    const authorizationHash = createHash("sha256")
      .update(authorization)
      .digest();

    if (timingSafeEqual(authorizationHash, apikeyHash)) {
      return await userHandler(event, context);
    }

    return {
      statusCode: 401,
      headers: {
        "Content-Type": "application/json",
      },
      body: JSON.stringify({
        message: "Unauthorized",
      }),
    };
  };
}
Here we check for a match between our API Keys, and if we get a match we run our user handler and return the result, otherwise, we return a 401 unauthorised response.
This gives us a new handler that wraps the functionality of our user handler. This doesn't explain the deployment snippet though, how do we inject our new handler and its required environment variables without modifying our lambda functions? This is where CDKTF Aspects come to the rescue. We deploy our lambda layer using CDKTF and then supply the ARN for the lambda layer to a CDKTF Aspect that applies it to the lambda function. The aspect looks something like this:
export class LambdaLayerInstrumentAspect implements IAspect {
  constructor(private instrumentationLayerArn: string) {}

  // This method is called on every Construct within the specified scope (resources, data sources, etc.).
  visit(visited_node: IConstruct) {
    if (visited_node instanceof aws.lambdaFunction.LambdaFunction) {
      const node = visited_node as aws.lambdaFunction.LambdaFunction;
      // We need to take the input value to not create a circular reference
      const currentEnv = node.environmentInput ?? {};
      const currentHandler = node.handlerInput ?? "index.hander";
      const currentLayers = node.layersInput ?? [];

      if (!process.env.API_KEY) {
        throw new Error("API_KEY environment variable must be set");
      }

      node.handler = "/opt/instrumentation.handler";
      node.layers = [...currentLayers, this.instrumentationLayerArn];
      node.environment.internalValue = {
        variables: {
          ...currentEnv.variables,
          API_KEY: process.env.API_KEY,
          USER_HANDLER: currentHandler,
        },
      };
    }
  }
}
Here we visit a node in the deployment plan, check if that node is a lambda function, and if it is we inject our lambda layer. We also take the developer-supplied handler and place it in an environment variable, USER_HANDLER, we then change the node handler to point towards our layer's patching handler that will pull the path from the user layer from the environment variable and dynamically load it. We also add our API_KEY environment variable to the lambda that is used by our wrapper handler to validate the incoming apikey header.
The final stage is to apply the aspect to our stack:
    Aspects.of(this).add(
      new LambdaLayerInstrumentAspect(instrumentationLayer.arn),
    );
There we have it, we've enabled a transparent authentication method that enables developers to be secure by default. If you're interested or want to see the full code base then check out the GitHub repository here: https://github.com/Aiden-Ziegelaar/self-instrumenting-lambda-demo
This was mostly built as a POC and doesn't provide all the functionality you'd expect, such as; runtime discrimination, opt-out functionality, API keys stored in actually safe locations or a parent API GW. I was mostly interested in exploring the use cases for CDKTF aspects that modified underlying infrastructure.