


In some scenarios, the traditional API key header, or humble JWT bearer token, is not enough to secure our most sensitive information. Therefore we must turn to other methods to ensure privileged access to information is correctly implemented. The Financial Grade API Specification provides a high level of security to protect such endpoints. This post is mainly going to focus on how to consume such APIs and the reasoning behind the tools used.
The FAPI standard is primarily built on top of the OAuth2 Framework and this post does assume some familiarity with OAuth2 concepts. However, it should be easy enough to follow if you are still fairly new to OAuth2.
The FAPI standard itself defines very little new functionality, it is predominantly concerned with combining other standards to create a secure authorisation layer. For example, whilst it is built on the OAuth2 specification, it defines limits around exactly what OAuth2 flows are allowed and how clients can call them.
Some Terms to Get Started
Authorisation Server: This is the authority that governs all authorisation decisions. It is responsible for evaluating authorisation requests and returns the corresponding credentials (or an error) to the correct parties.
Client: The client is the requesting party, who wishes to gain access to privileged resources protected by the authorisation server.
User: Typically this is the owner of the specific resources that the client is requesting credentials to access. Clients obtain credentials to access data or perform actions on behalf of a user.
Becoming a Client
The first stage to getting authorisation credentials from a FAPI-compliant authorisation server is to become a registered client for that authorisation server. The method required to become a registered client varies from implementation to implementation. Newer implementations are synchronising clients between the registry and providers directly, so for some ecosystem implementations this may be avoided and you can skip right ahead to obtaining credentials.
In other cases, this will typically occur through some sort of Dynamic Client Registration (DCR) that may either be governed by the authorisation server, or in many cases in OpenData ecosystems around the world, will be governed by a central authority. So let's take a look at what this process might look like.
When you are onboarded onto your central authority you will generally be provided with three key pieces of information, which you will either generate yourself or be provided with as part of the onboarding process:
Client Certificate, this is a TLS certificate that our client will use to connect to participants in the ecosystem.
JWT Private Key, this is a private signing key, either Elliptic Curve or RSA, that is used by the client to sign requests to the authorization server
Client ID (and possibly Secret) to interact with ecosystem authority
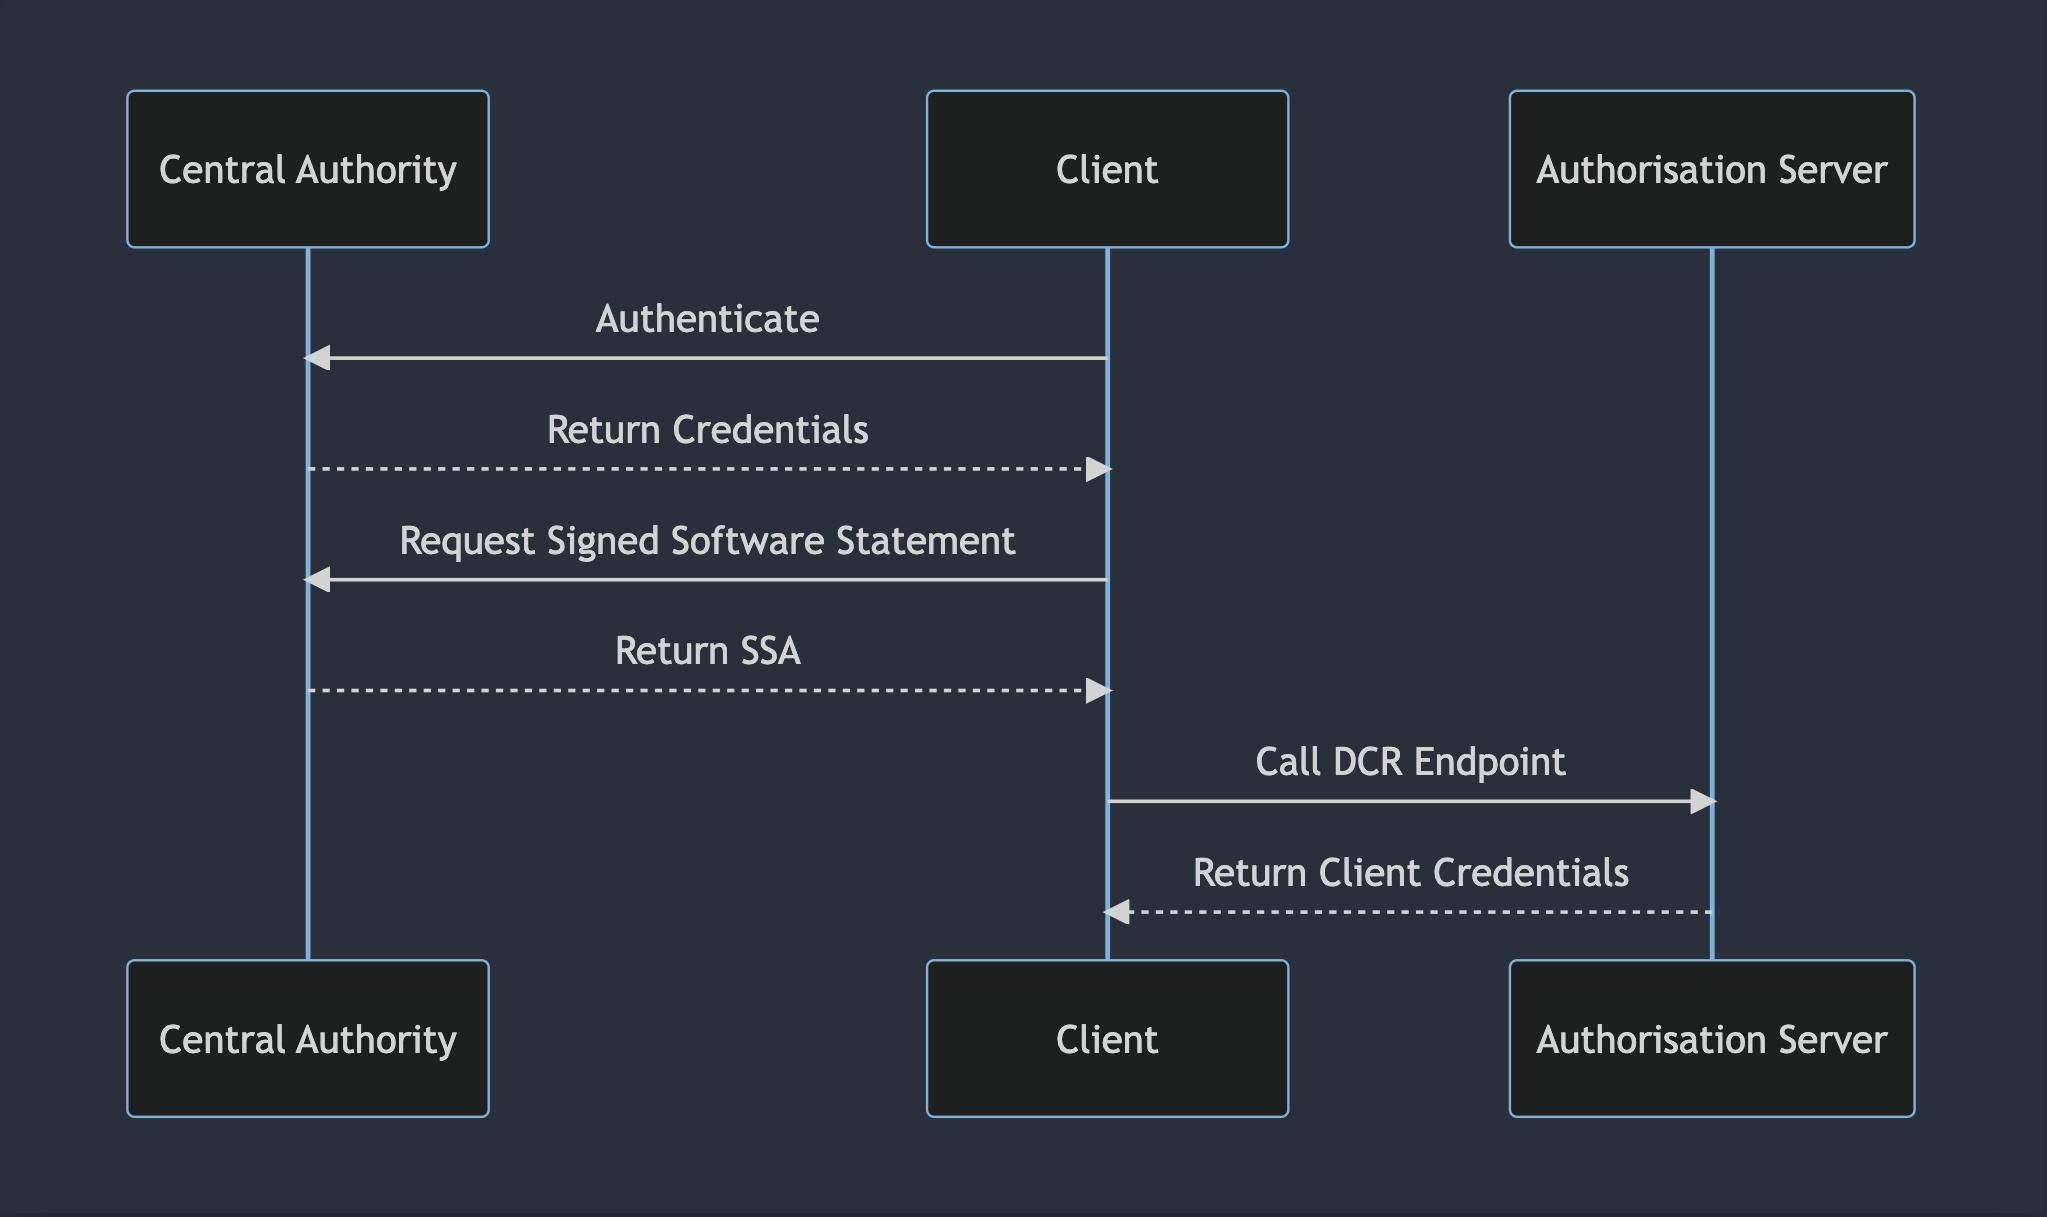
Once you're onboarded a basic DCR flow might look something like this:
sequenceDiagram
    participant Central Authority
    participant Client
    participant Authorisation Server
    Client->>Central Authority: Authenticate
    Central Authority-->>Client: Return Credentials
    Client->>Central Authority: Request Signed Software Statement
    Central Authority-->>Client: Return SSA
    Client->>Authorisation Server: Call DCR Endpoint
    Authorisation Server-->>Client: Return Client Credentials
All of these requests are made using a mechanism called mutual TLS or mTLS for short. If you're familiar with TLS you might know that when we connect to a TLS-protected HTTPS endpoint on a browser, the server provides a certificate to our browser that then checks it against a list of trusted authorities. That part still happens in mTLS, however, we, as the client, also provide a certificate to the server, which the server then checks against its trusted authorities. This certificate that we provide as a client is the same certificate that was issued to us (or more likely signed through a CSR) by the ecosystem authority.
Obtaining Credentials
So now we've managed to register ourselves as a client with the authorisation server that protects the resources that we want to access. The next step is for us to obtain consent from the resource owner for the resources that we want to access. The FAPI specification has some very strict rules around the ways we can obtain these credentials, here's a quick summary:
We must use the "Authorisation Code" flow, in this flow the user provides consent through the authorisation server and receives an authorisation code in return. This code is then provided back to us, the client, which we can exchange with the authorisation server to receive an access token to access protected resources. This is a flow defined in OAuth2 and is one of the flows considered to be more secure than alternative flows.
We must use Proof of Code Key Exchange (PKCE), essentially this is a way for us to prove that the client trying to retrieve the access token using the authorisation code, is the same client that made the original authorisation request. Typically this is using a secret value and its hash, we provide the hash when we make our first request. When we request our access token we reveal the secret value, proving that the flow hasn't been hijacked.
We must use a Pushed Authorization Request (PAR) to initiate the request. By using PAR, we send all the details relating to our request to the authorisation server. The authorisation server then tokenises those details and sends us a URL to direct the user to. This prevents any of those details from being leaked by passing them via the user.
We must use some form of sender-constrained access token either through mTLS Certificate Bound Access Tokens or through Demonstrating Proof of Possession (DPoP). We will focus on certificate-bound access tokens in this example. All requests between us, the Authorisation Server, and the Resource Server use mTLS, the fingerprint of our mTLS client certificate will be stored in the access token. When we make requests to the resource server the resource server will verify that the certificate we used to connect matches the certificate fingerprint in the token. This prevents anyone who doesn't have a copy of the private key of our certificate from connecting.
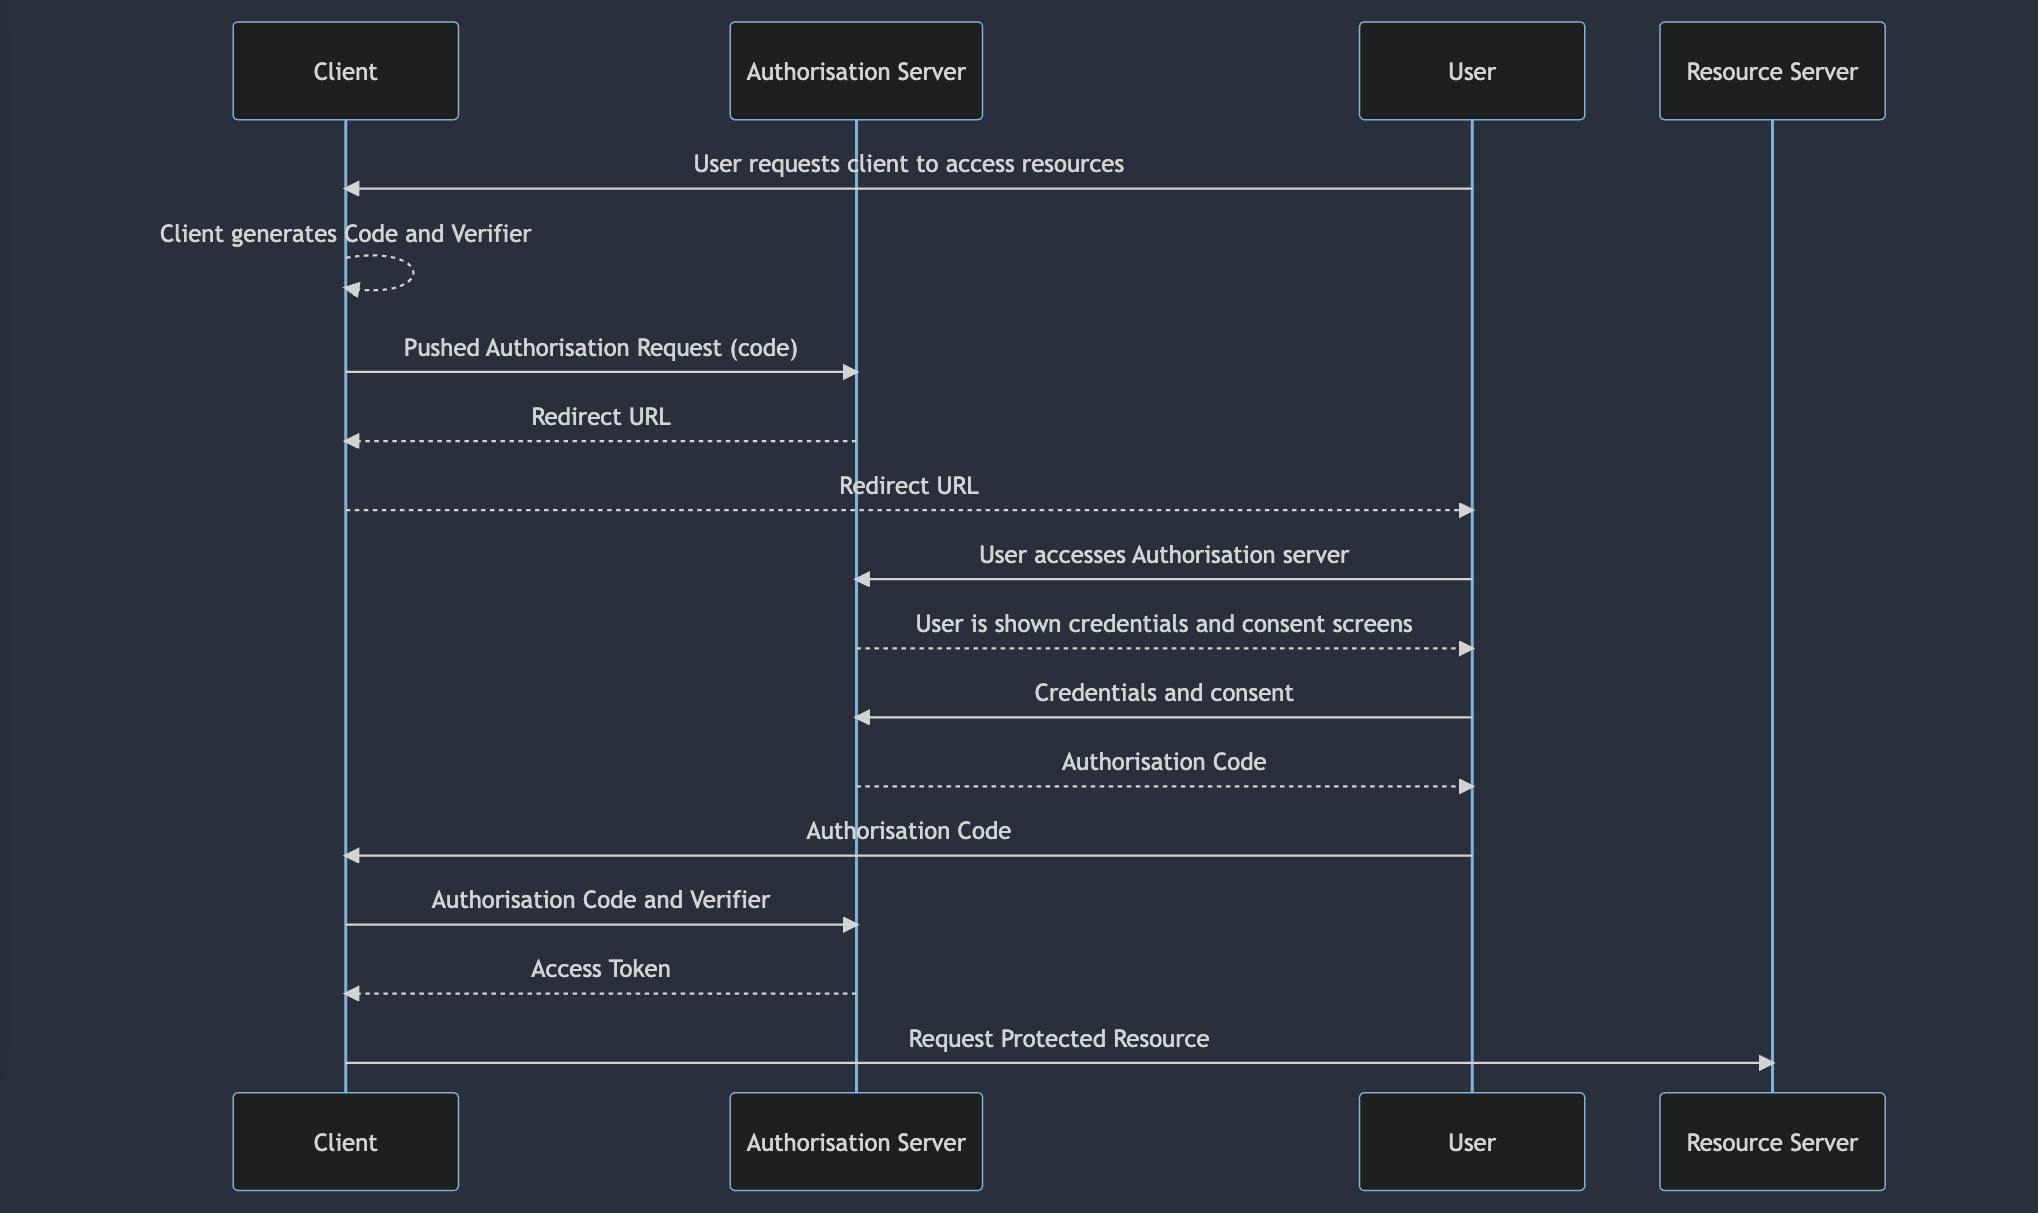
The full flow for obtaining credentials looks something like this:
sequenceDiagram
    participant Client
    participant Authorisation Server
    participant User
    participant Resource Server
    User->>Client: User requests client to access resources
    Client-->>Client: Client generates Code and Verifier
    Client->>Authorisation Server: Pushed Authorisation Request (code)
    Authorisation Server-->>Client: Redirect URL
    Client-->>User: Redirect URL
    User->>Authorisation Server: User accesses Authorisation server
    Authorisation Server-->>User: User is shown credentials and consent screens
    User->>Authorisation Server: Credentials and consent
    Authorisation Server-->>User: Authorisation Code
    User->>Client: Authorisation Code
    Client->>Authorisation Server: Authorisation Code and Verifier
    Authorisation Server-->>Client: Access Token
    Client->>Resource Server: Request Protected Resource
Using Credentials
Now that we have obtained some credentials we can use them to access our target resources. To correctly access a resource there are a few considerations:
The resource server will check that the mTLS certificate that we used to connect matches the mTLS certificate fingerprint in the access token.
The resource server will validate that the user has provided the correct consent for the resource being accessed by checking the scopes of the access token.
The resource server will validate that the access token complies with standard OAuth2 criteria. Checking claims such as
jti,nbf,exp,issect.Depending on the configuration of the access token these validations might require the resource server to call the authorisation server to introspect the access token. This typically happens if the access token contains only limited data, or in the case of pairwise identifiers.
Conclusion
Hopefully, you now have a basic understanding of the mechanisms behind FAPI 2.0 and can start interacting with ecosystems built using FAPI 2.0, especially in the OpenData space. The key takeaways from this post are:
FAPI 2.0 is a highly secure standard built over the top of OAuth2 and a host of other standards for the secure exchange of information.
All connections, except for connections made by the end user, are secured with mTLS.
FAPI 2.0 provides assurances that the user of any token is the same client that requested it through sender-constrained access tokens.